

AI is taking over the world rapidly. Every segment in tech is being rethought and revolutionized using AI. As a software developer, at some point in your career, you’ll definitely have an encounter with AI so it only makes sense to have some experience working with it under your belt. The field of AI is extremely vast and it’s way beyond the scope of this post but still, I want to show you how easy it is to integrate intelligence in your apps with minimal work. Of course, you’ll not be training any machine learning models to achieve this, you’ll use a pre built solution, which is why it will take extremely minimal work on your end.
We’ll build an extremely simple sentiment analysis system on Android using the Watson API by IBM. IBM builds a lot of useful integrations that can directly be used by developers without going through the hassle of building the infrastructure on their end. They tie all their offerings under Bluemix which is a suite of products to build better software. What’s great about Bluemix is the fact that it comes in for free for 30 days so you don’t have to make a commitment straight on. If you are interested in checking out their offerings head over to the Bluemix website and signup for a 30-day trial.
Alright so let’s get started building the app. Before starting here’s a quick disclaimer. This article will completely assume that you have some experience with object oriented programming and Android. The Android part of the project is pretty minimal so all you need is basic knowledge of views and how to manipulate them.
Now that we’re done with the formalities let’s get started.
Step 1: The Setup
Fire up Android Studio and create a new project. Name it anything you want and accept the defaults in the setup wizard. Once the project builds, run it on a device or emulator just to make sure everything is working fine. If everything is good so far you’re ready to proceed to the next step.

Step 2: Building the UI
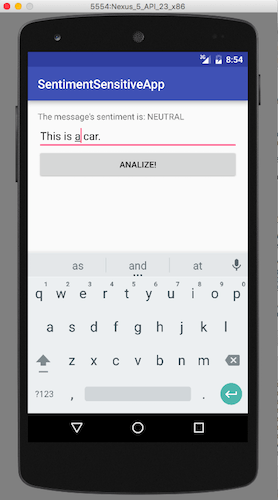
Let’s start building the layout. Since the app is pretty minimal let’s get the layout part out of the way as quickly as possible. Here’s what the final app screen will look like.
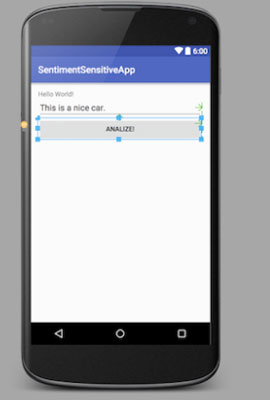
It comprises of a TextView an EditText and a Button all of them are contained inside of a LinearLayout. Once you are done replicating the layout, just jump on to the corresponding Java file and wire up your UI as follows.
public class MainActivity extends AppCompatActivity {

    TextView textView;
    EditText editText;
    Button button;
    String sentiment;

@Override
    protected void onCreate(Bundle savedInstanceState) {
        super.onCreate(savedInstanceState);
        setContentView(R.layout.activity_main);

        //initialize UI elements
        textView = (TextView) findViewById(R.id.textView);
        editText = (EditText) findViewById(R.id.editText);
        button = (Button) findViewById(R.id.button);
Let’s hook up the button with a click listener so that it responds to touch events. Here’s the code for that:
button.setOnClickListener(new View.OnClickListener() {
            @Override
            public void onClick(View v) {
                System.out.println("Logging to the console that the button pressed for the text: " + editText.getText());
                textView.setText("Displaying at UI the sentiment to be checked for: " + editText.getText());

                AskWatsonTask task = new AskWatsonTask();
                task.execute(new String[]{});
            }
});
Notice the AskWatsonTask? That’s what will be used for fetching the sentiment analysis results from Watson API. It’s nothing but a simple AsyncTask. Copy and paste the following piece of code:
private class AskWatsonTask extends AsyncTask <String, Void, String> {
    @Override
    protected String doInBackground(String... textsToAnalyse) {
        System.out.println(editText.getText());
        runOnUiThread(new Runnable() {
            @Override
            public void run() {
                textView.setText ("what is happening inside a thread - we are running Watson AlchemyAPI");
            }
        });

        sentiment = "Test sentiment";
        System.out.println(sentiment);

        //passing the result to be displayed at UI in the main tread
        return sentiment;
    }

    //setting the value of UI outside of the thread
    @Override
    protected void onPostExecute(String result) {
        textView.setText ("The message's sentiment is: " + result);
    }
}
The above mentioned AsyncTask will fetch results from Watson in JSON format which we will parse later on and display in the UI. As of now, the app is pretty dumb but it works. To record a checkpoint lets deploy the app we’ve built so far and seen what it does. Hit the green Play button and watch it run. It doesn’t do anything.
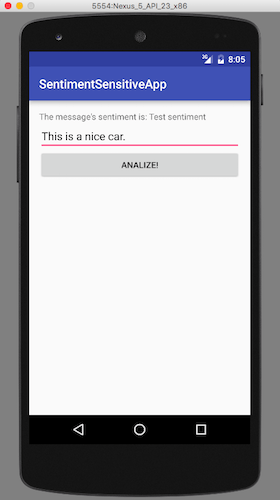
If you click the Analyze! button, you should be able to see the result at the TextView field. You should also see some output in the log cat window.
Step 3: Adding the Smarts
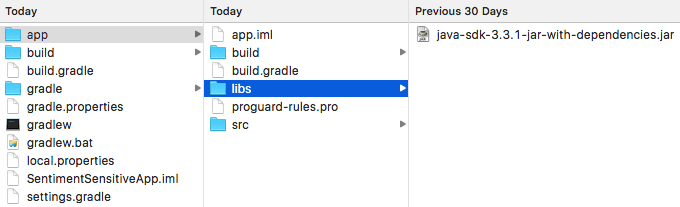
It’s time to add the cognitive ability to this bare bones of an app. The first thing you need to do is add the Watson Cloud SDK for Java in your app. head over to this link for a detailed explanation on how to do so. Download the Java library from this link. And add it to the libs folder as follows.
Once the library is integrated, you need to acquire internet permissions in your app. Open the AndroidManifest.xml and add the following lines
<uses-permission android:name="android.permission.ACCESS_NETWORK_STATE" />
<uses-permission android:name="android.permission.INTERNET" />
The above permissions will allow you to access the network to fetch the results from Watson.
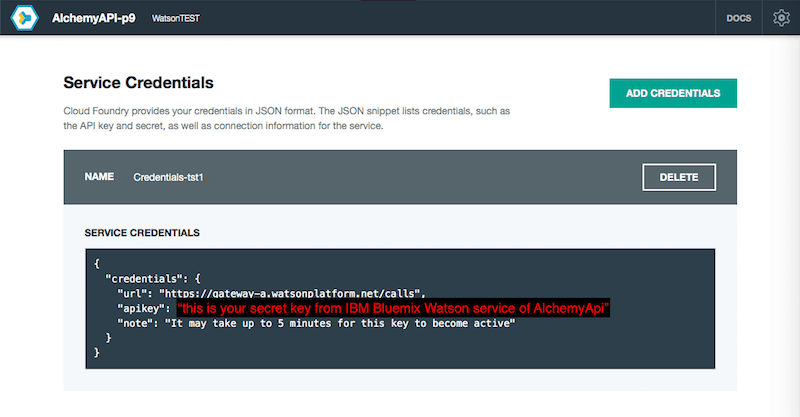
Step 3b: Retrieve the API key from Bluemix
From the IBM Bluemix catalog, click Watson => AlchemyAPI => Create. Be sure to use a static API key as shown in the following image:
 Step 4: Add the Code to Invoke Watson
Now it’s time to add some code to communicate with the Watson Alchemy API. Expand the AskWatson AsyncTask with the following code.
AlchemyLanguage service = new AlchemyLanguage();
service.setApiKey("");

Map<String, Object> params = new HashMap<String, Object>();
params.put(AlchemyLanguage.TEXT, editText.getText());
DocumentSentiment sentiment = service.getSentiment(params).execute();
System.out.println(sentiment);

//passing the result to be displayed at UI in the main thread
return sentiment.getSentiment().getType().name();
Time to quickly test if the app is working. Hit Ctrl+R and watch the app be all smart!
{
   "docSentiment": {
     "score": -0.42344,
     "type": "negative"
   },
   "language": "english",
   "totalTransactions": 1
}
Conclusion
You just saw how easy it was to build a cognitive app using Watson Sentiment Analysis. The app we built didn’t have any real functionality per say but it showed the capability of Bluemix and its offerings. You can put these offerings under multiple brackets and build some extremely rich user experiences. Head over to Bluemix’s website to learn more about what all you can build.

Leave a comment
Have something to say about this article? Add your comment and start the discussion.