In this article, we’ll share with you a way by which you can prevent other people from opening or modifying your documents, presentations and workbooks in Microsoft Office 2007.
Microsoft Office Word
- First let’s see how to encrypt your file and set a password to open it:
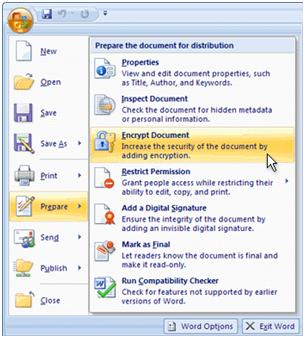
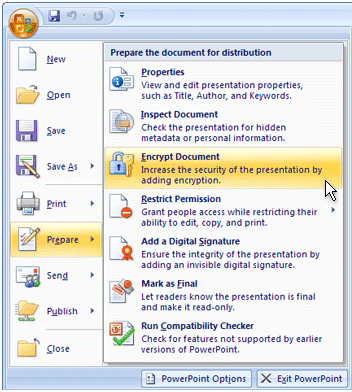
1. Click the Microsoft Office Start Button -> Prepare -> Encrypt Document
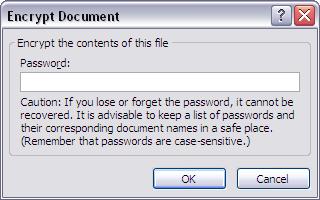
2. In the Encrypt Document dialog box, in the Password box, type a password, and then click OK (You can type up to 255 characters)
Note: Passwords are case sensitive. And remember the passwords because Microsoft cannot retrieve forgotten password.
3. Now type the password again in the Confirm Password dialog box, in the Reenter password box and click OK.
4. To save this password, save the file. In this way your file is password protected.
- Now we’ll see how to remove password from your word document. Follow the steps below to do the same:
1. Use the password to open the document.
2. Click the Microsoft Office Start Button -> Prepare -> Encrypt Document.
3. In the Encrypt Document dialog box, in the Password box, delete the encrypted password, and then click OK.
4. Save the file, the password is removed from your word document.
- To Set a password to modify a Word document
You can even set a password to allow others to modify the document.
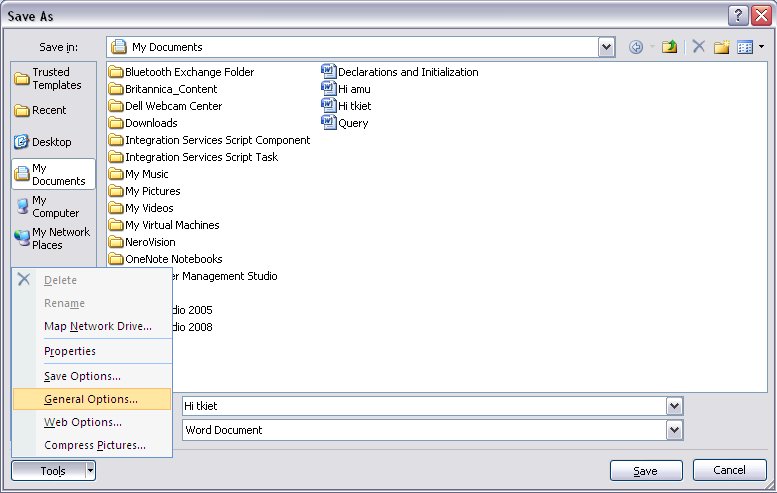
1. Click the Microsoft Office Start Button, click Save As, and on the bottom of the Save As dialog, click Tools.
2. On the Tools menu, click General Options.
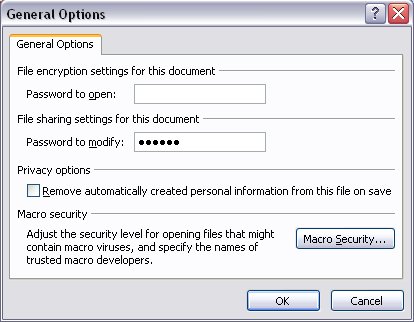
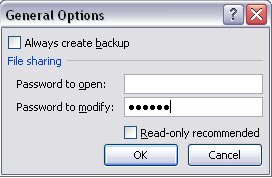
3. The General Options dialog opens. Under File sharing options for this document, in the Password to modify box, type a password.
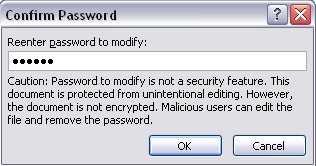
4. In the Confirm Password dialog, re-type the password. Click OK.
5. Click Save.
- To remove the password, repeat the above instructions and then delete the password from the Password to modify box. Click Save.
Microsoft Office PowerPoint
- To encrypt your presentation and set a password to open it:
1. Click the Microsoft Office Start Button, point to Prepare, and then click Encrypt Document.
2. In the Password box, type a password, and then click OK (You can type up to 255 characters).
3. In the Reenter password box, type the password again, then click OK.
4. To save the password, save the file.
- Let’s see how to remove password protection from your PowerPoint presentation
1. Use the password to open your password protected presentation.
2. Click the Microsoft Office Start Button -> Prepare, then click Encrypt Document.
3. In the Encrypt Document dialog box, in the Password box, delete the encrypted password, and then click OK.
4. Save the presentation.
- To set a password to modify a PowerPoint presentation
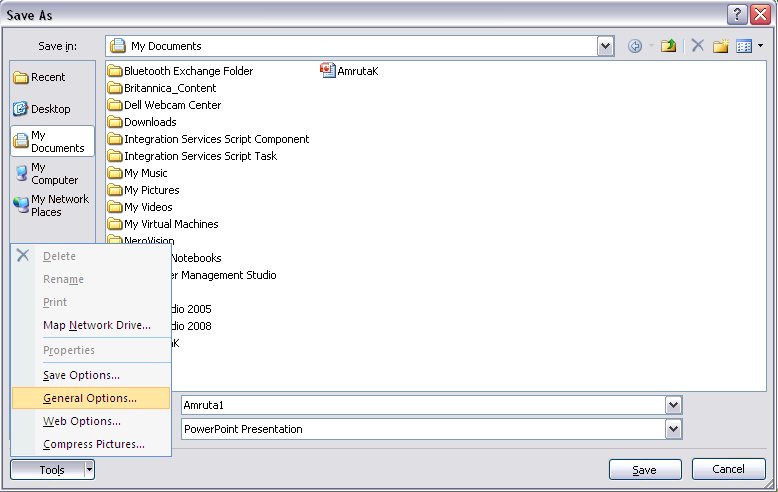
1. Click the Microsoft Office Start Button, click Save As, and on the bottom of the Save As dialog, click Tools.
2. On the Tools menu, click General Options.
3. The General Options dialog opens. Under File sharing settings for this document, in the Password to modify box, type your password.
4. In the Confirm Password dialog, retype the password, then click OK.
5. Click Save.
- To remove the password, repeat the above instructions and then delete the password from the Password to modify box. Then click Save.
Microsoft Office Excel
- Password in an Excel spreadsheet can be set:
1. Click the Microsoft Office Start Button -> Prepare -> Encrypt Document.
2. In the Password box, type a password, and then click OK(You can type up to 255 characters).
3. In the Reenter password box, type the password again, and then click OK.
4. To save the password, save the file. Here, your file is password protected.
- To remove password protection from your Excel spreadsheet; perform same steps followed for Microsoft Office Word and PowerPoint.
- As we saw how to set a password to allow others to modify the word document and presentations, we can even set password for modifying the spreadsheet. To do this perform following steps:
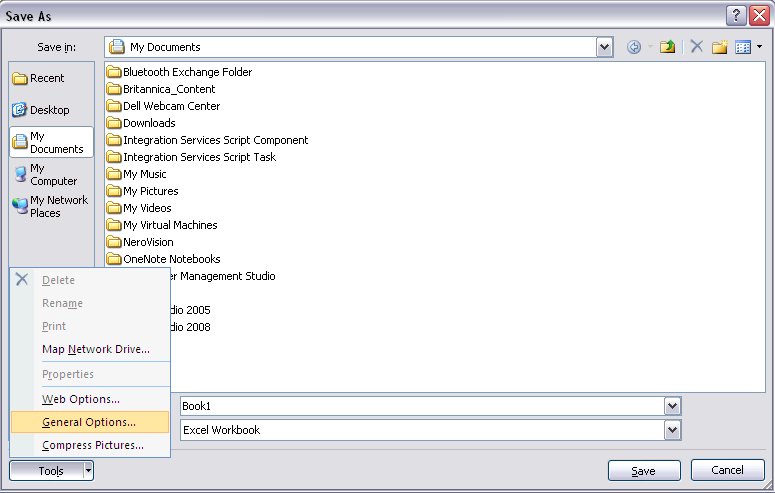
1. Click the Microsoft Office Start Button, click Save As, and on the bottom of the Save As dialog, click on Tools.
2. On the Tools menu, click General Options.
3. The General Options dialog opens. Under File sharing, in the Password to modify box, type a password.
4. In the Confirm Password dialog, re-type the password. Click OK.
5. Click Save.
- Note: To remove the password, repeat these instructions and then delete the password from the Password to modify box. Click Save.
Share your views and opinions in the comments.




Leave a comment
Have something to say about this article? Add your comment and start the discussion.