

Before explaining how to fix WMI Provider Host high CPU usage, let’s first explain what this issue is about. What is WMI provider host? The WMI Provider Host (WmiPrvSE.exe) is short for Windows Management Instrumentation Provider Service. It acts as a host that ensures that all the Windows management services operate as they should.
If the WMI Provider Host takes up large amounts of CPU (such as 30%+ usage) then it could cause certain applications to crash, and you could experience a black screen or ‘blue screen of death’ crash. However, this type of crash is not always due to high CPU usage – there are other causes. If the issue is related specifically to WMI Provider Host high CPU usage, then the following are ten optional solutions to the problem.
They may also help resolve the err_connection_reset error which is relatively common with Google Chrome. Learn more about the err-connection-reset error here.
We begin with some simple things you can try first. If these don’t work then you will have to go on to the rest. Simple fixes for high CPU usage sometimes work perfectly – but you will often have to go one or two steps farther to fix your problem.
1. Reboot – May Resolve WMI Provider Host High CPU Issues
Simple! If you are lucky, you can cure a whole host of computer ills by simply switching it off, waiting 10 minutes and then switching back on again. It can also work for WMI Provider Host issues, so try that first.
2. Scan for Viruses
Viruses can cause high CPU usage issues and other side effects that would be expected of any of the problems normally associated with WMI Provider Host high CPU usage in Windows 10 Creators Update. Run a virus scan and remove any that are detected. If you do not have a commercial anti-virus application installed then run Windows Defender which comes with the Windows 10 package.
3. Fix High CPU Usage Issues in Windows 10 by Editing the Registry
It may be possible to fix WMI provider host issues by editing the registry on your computer/laptop. Here’s how to do that:
- Press the Windows key + R.
- Type in ‘Regedit‘ into the Run box.
- Go to: HKEY_LOCAL_MACHINE\SYSTEM\CurrentControlSet\Control\Session Manager\Memory Management in the editor.
- Look to right-hand window and find ClearPageFilkeAtShutDown. This will likely be set at 0: 0x00000000 (0).

- Change the value to 1: 0x00000001 (1).
- Restart your computer.

This may resolve the problem. If not, continue with the following list until the WMI Provider Host issue has been resolved.
4. Reimage Plus Software Scan
Reimage Plus can fix several computer issues, such as blue screen of death, freezes, crashes and virus damage. Click Here to download it, and once downloaded simply click on it to install. It is very easy to use. It can check for viruses and any damage they may have caused, and also replace damaged or missing files that are needed by Windows 10.

Reimage has the ability to fix computer problems related to blue screens, crashes and freezes, DLL files, remove virus damage and more by replacing missing, corrupt and damaged files. Once you have installed it, it will begin to scan your PC or laptop and identify and fix any issues related to the WMI Provider Host that it finds. The scan is free, but the corrections are not. This may correct your problem, but if not then there are other things you can do.
5. Restart WMI Provider Host on Windows 10 Creators Update
Some who have experienced the Windows 10 WmiPrvSE.exe high disk usage issue on the Creators Update have found that restarting the WMI Provider Host Service can fix it. To do that,
- Press the Windows icon on your keyboard or taskbar along with the letter R (so press Win + R).
- Typing services.msc into the search box and then hit Enter.

- Scroll down the Service items to select Windows Management Instrumentation and then click Restart.

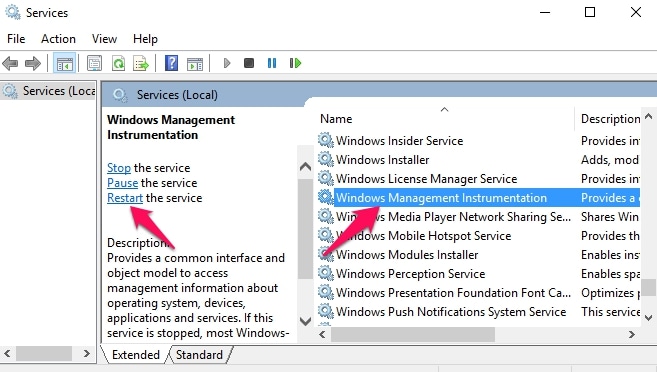
After clicking Restart reboot your device and find out whether or not the issue has been resolved. If not, then restart some other WMI Provider Host related services. Here’s what to do:
- Go back to the Run command (Win key + R) then type in cmd.exe, this takes you to the DOS command prompt. If given the option. Select Run as Administrator.

- Type the following into the Command Prompt window with a new line for each, and then press your ‘Enter’ key.

- net stop iphlpsvc
- net stop wscsvc
- net stop Winmgmt
- net start Winmgmt
- net start wscsvc
- net start iphlpsvc
It should look like this:
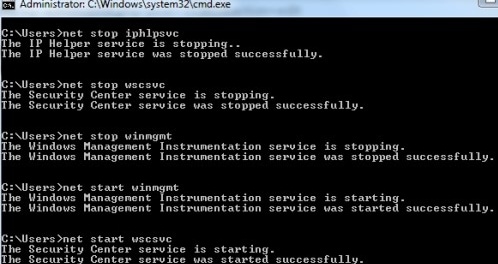
Now reboot your laptop or PC and check to find if the problem persists. If you still have an issue then work through the following until the problem is resolved.
6. Run Systems Maintenance Troubleshooter
This is another potential solution to fix WMI Provider Host high CPU usage in Windows 10. If none of the above has worked, then run the system maintenance troubleshooter. Here’s how to do this:
- Press the Windows key + R as explained above to get to the Run entry window.
- Enter msdt.exe -id MaintenanceDiagnostic into the window (you can copy and paste that text) then press Enter.

- Click OK and then reboot to check if the problem is solved.

7. Run the SFC Utility (System File Checker)
This is another potential simple fix. The Windows system file checker can identify corrupt files in your Windows 10 directories. To apply this:
- First, click on or press the Windows icon + R. Use the drop-down arrow to find cmd.exe or simply type that text into the window. You are now in the Command Prompt area.
- Type the following text at the command prompt: sfc/scannow.
- All protected files will be scanned and any corrupted files will be replaced as new.
It is important to keep this screen open until the scan and replacements have completed.
8. Use Event Viewer to Identify Problems
Event Viewer is an application that comes with Windows 10. You can use it to identify the events that are causing you problems. You can use that event ID to either stop or disable the particular event that was causing you problems. Here’s how:
- Press the Windows + X together – choose ‘Event Viewer‘ from the drop-down menu.

- Click on ‘View‘ then click on ‘Show Analytic and Debug Logs‘.

- Now go to Applications and Services Logs > Microsoft > Windows > WMI-Activity.

- Click WMI-Activity and expand it then click on Operational. This should open the operation logs of the WMI Provider Host.

- Now go to the General tab and look for ClientProcessID (PID) – take a note of the numbers provided.
- Close Event Viewer.
- Right-click the Start button: place your cursor over the Windows icon then right click.
- Now click on Task Manager – usually just over halfway down the list of options.
- Under the Services tab find the ‘service‘ with the same Process ID number as you copied under step ‘v’ above.

- When you find it then disable it: Right Click right on it to see the options – Click on Stop or Disable.
- Repeat step vii above, then click on Control Panel.
- Find Programs and under that look for Uninstall a program.
- Uninstall the disabled service and find out if this fix works.


If none of the above solutions work to fix the WMI Provider Host high CPU usage in the Windows 10 Creators update, then there are other ways of tackling this problem.
9. Reduce High CPU Usage with DISM Command
Deployment Image Servicing and Management is a tool that you can use to fix issues that appear after the Creators update. Here is how to use it to lower high CPU usage:
- Go to the taskbar search box and enter cmd – if you cannot find your search box, right click on the Windows icon on the taskbar, and select Search then enter cmd into the box that appears.
- The ‘command prompt’ will appear. Right click on that and then choose ‘Run as administrator’. That may show up at the bottom of the screen depending on your system.
- Now type the following instruction into the Command Prompt: DISM.exe /Online /Cleanup-image /Restorehealth.
- Hit ‘Enter’ and you should now see:

- Now enter the following after the Command Prompt: DISM.exe /Online /Cleanup-Image /RestoreHealth /Source:C:RepairSourceWindows /LimitAccess
- Hit ‘Enter’ again.

- Finally, after the Command Prompt enter: sfc /scannow and hit ‘Enter’.


Once the verification reaches 100%, you can restart your machine and find if it has been effective. It may take a while, depending on the extent of your problem.
10. Disable Windows Search Service
Occasionally, the Windows Search service can use up a lot of disk space. If you still have the WMI provider host high CPU usage problem, then this might help.
- First, go to the Start search box as above and type in cmd.exe.
- You should now see the Command Prompt button below this.
- Right-click on this Command Prompt button. then select ‘Run as Administrator’ from the drop-down option list.
- You should now see a UAC window prompt: Click ‘Yes’ on this.
- Finally, type in: exe stop “Windows search” then click Enter.
- You should now see the following screen:
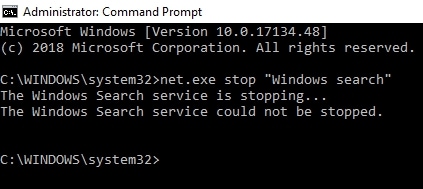
Windows search can often take up a lot of space. By following the steps above, you can disable this function and perhaps resolve your problem.
Vulkan Runtime Libraries
Finally, there are the Vulkan Runtime Libraries which are installed on your system when the graphics drivers are updated on your computer. This is therefore not an option as those above are. It is fundamentally a 3D graphics and compute API. You can find more about the Vulkan Runtime Libraries here and how to find if the API is installed on your computer.
It helps to reduce the CPU usage on your computer while running heavy performance-inducing tasks. Also, it helps in lowering the CPU usage on the computers during heavy performance-inducing tasks so that the performance cores don’t max out which could result in shut-down of the computer.
WMI Provider Host High CPU – Conclusion
The above are our top 10 fixes for the WMI Provider Host High CPU Usage issue in Windows 10. There are others, although those above do work for many people without them expending too much money. The majority are free to users, and – as we have stressed – many are free to use. So why not try them out? You may be able to solve your problem right now! Restart the computer and go to the Task Manager to check if the excessive CPU or RAM usage has been lowered down.
Leave a comment
Have something to say about this article? Add your comment and start the discussion.