

Have you ever wanted to set CPU priority to prefer foreground apps? There are certain methods using which you can change your system preference to run foreground apps more efficiently. We will be discussing these in detail in this tech guide. But first, let’s understand what CPU priority is. When you work on your system there are a number of foreground and background apps running apart from the ones that you are using. The CPU allots each of these applications a slice of its time. The higher priority apps get a longer time slice and run faster than the lower priority apps. So, if you want to run your foreground apps more efficiently you need to set CPU priority suitably. Here, we are going to see, the way to change CPU priority in Windows 10.
Read on to know about each method in detail.
Set CPU Priority to Prefer Foreground Apps
Method 1: Adjust Foreground Apps
This is a simple way to set CPU priority to prefer foreground apps. Firstly, sign in to Windows 10 (or the version that you are using) with administrator privileges account. Now follow these steps:
- Step 1: Press Windows + X key at the same time to open the Quick Access menu and then navigate to the Control Panel from the Menu.
- Step 2: Now go to “System and Security” option.

- Step 3: Next click on System and Security to go to the Settings.

- Step 4: Then click on System and then navigate to Advanced system settings option in the left pane in the System window and hit enter. This will open the System Properties window.

- Step 5: In the System Properties dialog box, go to the Advanced tab and then go to Settings under the Performance category. A Performance Options window will open.

- Step 6: In the Performance Options window, again navigate to the Advanced tab, and checkmark the circle against Programs under Adjust for best performance of: Programs“.

- Step 7: Lastly, click on Ok and then Apply to complete the method.


This will adjust the CPU priority for the best performance of applications. Usually, Windows has this as a default setting. Anyway, you have now learned how to get this default setting if your system already did not have it.
Method 2: Change DWORD Value in Registry Editor
Another way to set CPU priority to prefer foreground apps is by using the Registry Editor. In this method, you adjust the CPU priority by changing the DWORD value to prefer the foreground apps. Follow the step by step instructions given below:
- Step 1: Press Windows + R key simultaneously to open the Run dialog box. Type regedit in it and press Enter to launch the Registry Editor.
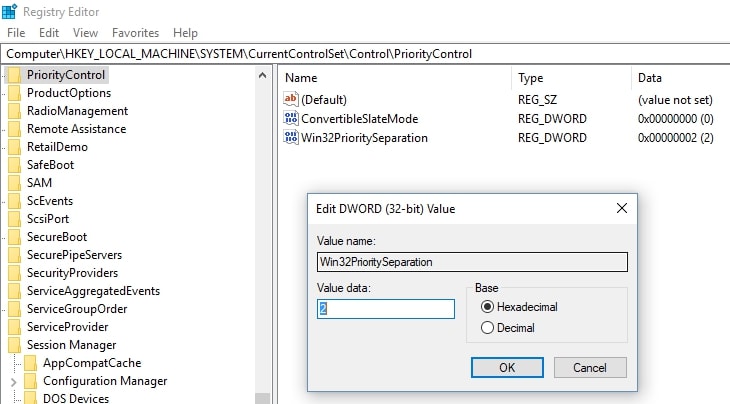
- Step 2: Navigate to the following Registry Key in the Registry Editor:
HKEY_LOCAL_MACHINE\SYSTEM\CurrentControlSet\Control\PriorityControl
Note: This key defines the background vs foreground priority differential. The possible default values for Win32PrioritySeparation are REG_DWORD 0, 1, or 2, which define the priority to be allocated to the application running in the foreground.
- Step 3: Now double click the Win32PrioritySeparation that can be seen in the right pane of the Registry Editor. You will see its value data is set to 2.
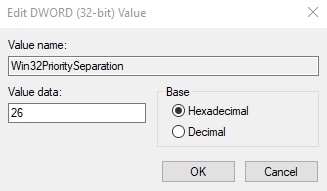
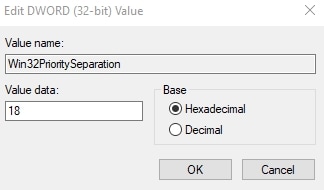
If you want to enhance the performance of foreground apps, just set the Value data as 26. However, if you want your background processes/services to run more efficiently, you can set the Value data as 18.
- Step 4: Now click on Ok and your process is finished.
In this way, you can successfully modify the DWORD value in the Registry Editor to set CPU priority to prefer foreground apps.
Conclusion
We hope you find this guide useful in setting your CPU priority. These two simple procedures explained here to set the CPU priority to prefer foreground apps is a good approach to enhance the performance of your favored apps.
Although the methods to change CPU priority are not very complicated, just be cautious while applying these so that you do not create any unnecessary mess in your system. In case of any queries or doubts do reach out to us via the comment section below. Have a good day, people!
Sujal Bishnoi
Thanks for the briefly explanation with steps
Your writing skill and explanation is very good. I like this very much
Thanks a lot for the information.